If you have an Ubuntu 8.04 installed on an Eeepc and will be using Audacity, the default ALSA will not work only the Jack Connection would work, but how do you configure your JACK?
Install Qjackctl using synaptic:
1. Go to System->Adminstration->Synaptic Package Manager.
2. Search on Qjackctl and check then install.
3. Go to Applications->Sound & Video->Jack Control.
4. Configure using these settings:
* Driver: oss
* Frames/ Period: 512
* Sample rate: 48000
* Periods/ Buffer: 20
* Word Length: 16
* Port Maximum: 1024
* Timeout: 5000
* Audio: Duplex
5. Click OK then Start jackd.
6. Run Audacity, then Edit-> Preferences.
7. Playback device and Recording device choose Jack Connection.
8. On the lower left side of the tracks, choose 48000 instead of 41000.
9. Record, Play, and Enjoy!
Or, you could upgrade to 8.10 Intrepid Ibex and is fixed by default without going into this trouble. :)
Tuesday, December 9, 2008

Monday, December 8, 2008
Want To Learn Java Using Qt Jambi For Free?
If you want to program in Java using Qt Jambi Framework from Nokia, this is it. Though this is just a tutorial of the basics, you will learn how to create your first Qt GUI program and run it. It also includes Java topics such as Language Basics: Strings, Numbers, Arrays, String Builder, Expressions, Statements, Blocks, and OOP concepts like Classes, Objects, and so on. It also include a link where you could copy and paste the source code book example creating your own Photo Slideshow!
1.Go to this Link: http://www.esnips.com/web/JavaQtBook
1.Go to this Link: http://www.esnips.com/web/JavaQtBook
How To Upgrade Your Ubuntu
1.Go to System-> Administration->Software Sources->Updates.
2.Release Upgrade, choose Normal Releases.
3.Then, go to System-> Administration->Update Manager.
4.Click on the button upgrade. This would take hours, depending on your Internet connection and computer speed.
5.Enjoy!
2.Release Upgrade, choose Normal Releases.
3.Then, go to System-> Administration->Update Manager.
4.Click on the button upgrade. This would take hours, depending on your Internet connection and computer speed.
5.Enjoy!
Monday, November 17, 2008
Web-Sequencer User Manual
Web-Sequencer User Manual (alpha)
http://web-sequencer.appspot.comDisclaimer
Since this is still on alpha stages of the program, there are still some bugs to iron out. Yet, it is tested to be working properly on our system. If you encountered bugs or lost work, we are not responsible because of this. You may report it to us using this email address: soundchemistry29@yahoo.com
Introduction
Music has been my passion ever since. I wrote this web application for educational purposes, enjoyment, and to promote striving artists (such as myself) to expose their talents thoughout the world using the miracle of the Internet Age.
Using this application gives users the ability to collaborate together as artists.
In this release, adding sound files, drag and drop support, playing, stopping, and starting works. You can save your work and recreate it; it can retrieve your saved work and show it on the list. But, showing other saved works were not tested yet.
The Application Roadmap: Add collaboration support like saving your friends work and retrieving it. Uploading Sound Files may, or may not be supported.
Requirements
-
Firefox 3.0 not 3.5
-
Quicktime plugin or Mplayer plugin (which works best)
-
MediaWrap extension for firefox (Windows)
In firefox (Linux): Edit→Preferences→Content You should find MP3 or MPEG layer 3 using Quicktime plugin or Mplayer plugin.

Plug-ins in firefox 2.0
Or, type: "about:plugins" in the address bar of the browser.
Usage
Uploading New Sound Files (not yet supported)
-
Scroll-down; Type a name for the file then click the browse button to locate your file.
Warning: You may only upload MP3 files. Other formats are not supported!

Uploading MP3 Files
-
Click "Upload" button.
Inserting Sound Files
-
Scroll down; choose the Sound File you want to insert then Click "Insert" button.

Inserting sound files
-
Scroll up; you will see a light blue bar on the upper left corner, below the Music Sequencer Title. This bar represents the sound file you inserted.

blue bar sound file inserted
-
Double-click, hold, drag, release! the blue bar, and position it in the track. The Track is represented by colors light blue and sky blue inside the frame.

tracks light blue and sky blue
Deleting Sound Files (Blue Bars)
-
Click on the Delete Check Box.
-
Click on the Blue Sound Files to Delete.
-
Uncheck the Delete Checkbox.
Copying Sound Files
After Inserting your Sound File, in the corresponding track, click the "Copy" button.
It will copy the sound file and insert another bar. The copied bars will have a distance according to the first sound file on the track between the yellow and blue/red track.

Copying Sound Files
Saving Your Work
-
To save a session,
-
Click button "Get Data," then, "Save Data."
Retrieving your Saved Sessions
-
Scroll down; You will see "Links of Saved Sessions."
-
Click on the User Name to retrieve the Saved Session.
-
Click "Recreate" button.
--End of User Manual Web-Sequencer alpha--
Saturday, September 6, 2008
Adding Scroll Bars in a Qt Widget
Read this:
http://foobar.lu/wp/2007/09/10/adding-scrollbars-to-a-qframe-in-qt/
http://foobar.lu/wp/2007/09/10/adding-scrollbars-to-a-qframe-in-qt/
self.scrollBarArea = QtGui.QScrollArea() #create object
self.stackedWidget.setParent(None)
self.scrollBarArea.setWidget(self.stackedWidget) #assign child widget to scroll area layout = QtGui.QVBoxLayout() #create Vertical Layout (QLayout won't run) layout.addWidget(self.scrollBarArea) #add the scroll area to layout
self.centralwidget.setLayout(layout) #add layout to the widget
self.stackedWidget.setParent(None)
self.scrollBarArea.setWidget(self.stackedWidget) #assign child widget to scroll area layout = QtGui.QVBoxLayout() #create Vertical Layout (QLayout won't run) layout.addWidget(self.scrollBarArea) #add the scroll area to layout
self.centralwidget.setLayout(layout) #add layout to the widget
Monday, June 23, 2008
PhotoMove User Manual v0.1
Disclaimer
If you encountered bugs or lost work, we are not responsible because of this. You may report it to us using this email address:soundchemistry29@yahoo.com
Introduction
This is my first application using the Python language. At first, I was thinking of a program that I miss in Windows that was not included in their recent system. Hint: It involves pictures and making slideshows. Therefore, I finally hit the idea of creating my own version.
Programming is also my trade, and if you like to see what other things I do, then you could visit my website: http://soundchemistry.multiply.com/,where you could download free MP3s even listen to it on-demand, which my aim is to promote striving artists (such as myself) to expose their talents thoughout the world using the miracle of the Internet Age.
My aim of creating this is for educational and fun! :)
Requirements
Python http://www.python.org/
Mencoder http://www.mplayerhq.hu/design7/news.html
ImageMagick http://www.imagemagick.org/script/index.php
Qt and PyQt http://trolltech.com/products/qt
FFDShow MPEG-4 codec (in Windows) http://www.free-codecs.com/FFDShow_download.htm
Gstreamer Plugins (in Linux)
Just download the required software from websites by searching it, and install in Windows Machine. In Linux, You could install it through Synaptic
Note: In Windows, you should add the path environment variables directing to mencoder and python executables.
Usage
Importing Pictures (only png or jpg supported)
Go to File → Import Images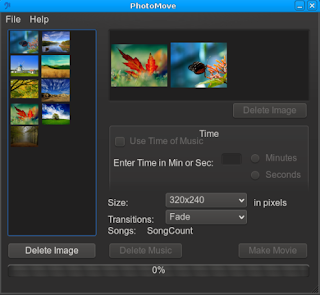
After selecting pictures, it will show up on the left images container with thumbnails. This is were your pictures will reside for you to choose what to include in the slideshow.
If you wish to delete an image from the image container, just click on the picture then click "Delete Image" at the bottom of the images container.
Including or inserting pictures for the Slideshow
Just click on the image on the left container and drag it to the upper right slideshow container.
The order of your pictures should be arranged in sequence on how it will be on your slideshow.
To delete an image, just click on the picture then press "Delete Image" below the slideshow container.
Importing Music (MP3 only supported)
Click File→Import Music
You can see the songs you imported on the "Songs" label with the song count. It will increment if you add another MP3. You may also delete songs by clicking "Delete Music." The Song counter will decrement starting last.
Time
There are two ways to choose for your slideshow's duration Using the time of your imported Music or, Enter your preferred time in minutes or seconds.
Size You may choose the size of your video by clicking on the Size drop-down list. The default is "320x240" in pixels.
Transitions
You may choose the effects or transitions in your slideshow by clicking on the Transitions drop-down list. The "Fade" effect is only supported in this version.
Make Movie
And finally, click the "Make Movie" button to encode the slideshow to .avi. Just choose which folder to save it and the file name.
That's It!
--End of User Manual PhotoMove v0.1--
If you encountered bugs or lost work, we are not responsible because of this. You may report it to us using this email address:soundchemistry29@yahoo.com
Introduction
This is my first application using the Python language. At first, I was thinking of a program that I miss in Windows that was not included in their recent system. Hint: It involves pictures and making slideshows. Therefore, I finally hit the idea of creating my own version.
Programming is also my trade, and if you like to see what other things I do, then you could visit my website: http://soundchemistry.multiply.com/,where you could download free MP3s even listen to it on-demand, which my aim is to promote striving artists (such as myself) to expose their talents thoughout the world using the miracle of the Internet Age.
My aim of creating this is for educational and fun! :)
Requirements
Python http://www.python.org/
Mencoder http://www.mplayerhq.hu/design7/news.html
ImageMagick http://www.imagemagick.org/script/index.php
Qt and PyQt http://trolltech.com/products/qt
FFDShow MPEG-4 codec (in Windows) http://www.free-codecs.com/FFDShow_download.htm
Gstreamer Plugins (in Linux)
Just download the required software from websites by searching it, and install in Windows Machine. In Linux, You could install it through Synaptic
Note: In Windows, you should add the path environment variables directing to mencoder and python executables.
Usage
Importing Pictures (only png or jpg supported)
Go to File → Import Images
After selecting pictures, it will show up on the left images container with thumbnails. This is were your pictures will reside for you to choose what to include in the slideshow.
If you wish to delete an image from the image container, just click on the picture then click "Delete Image" at the bottom of the images container.
Including or inserting pictures for the Slideshow
Just click on the image on the left container and drag it to the upper right slideshow container.
The order of your pictures should be arranged in sequence on how it will be on your slideshow.
To delete an image, just click on the picture then press "Delete Image" below the slideshow container.
Importing Music (MP3 only supported)
Click File→Import Music
You can see the songs you imported on the "Songs" label with the song count. It will increment if you add another MP3. You may also delete songs by clicking "Delete Music." The Song counter will decrement starting last.
Time
There are two ways to choose for your slideshow's duration Using the time of your imported Music or, Enter your preferred time in minutes or seconds.
Size You may choose the size of your video by clicking on the Size drop-down list. The default is "320x240" in pixels.
Transitions
You may choose the effects or transitions in your slideshow by clicking on the Transitions drop-down list. The "Fade" effect is only supported in this version.
Make Movie
And finally, click the "Make Movie" button to encode the slideshow to .avi. Just choose which folder to save it and the file name.
That's It!
--End of User Manual PhotoMove v0.1--
Thursday, March 20, 2008
GStreamer with Python in Qt (Learning by Example)
When I was getting started with python, my first solution is to buy a book because you have to learn first the fundamentals of the language before writing software. What amazes me about python is that once you learn the basics, you can choose which GUI (Graphical User Interface) toolkit you would like to use. These are GTK (using Glade), Tkinter (which comes with python), wxPython, MFC, and Swing, and of course Qt.
The best way to learn programming is by practice. Therefore, I decided to write a small program that shows a VU meter when music is playing. I decided to use Gstreamer since it is used in Linux, Windows, and Mac OSX.
My goal of writing this blog is to get other people new to Gstreamer, Python, and Qt and help them get started.
First, I would recommend reading PyQt's site to learn how to use Qt in python. Then, read this blog to have an introduction in Gstreamer, and this python tutorial.
Requirements:
1.Python
2.Qt
3.PyQt
4.Gstreamer 0.10 and plug-ins
Here is the source code:
The best way to learn programming is by practice. Therefore, I decided to write a small program that shows a VU meter when music is playing. I decided to use Gstreamer since it is used in Linux, Windows, and Mac OSX.
My goal of writing this blog is to get other people new to Gstreamer, Python, and Qt and help them get started.
First, I would recommend reading PyQt's site to learn how to use Qt in python. Then, read this blog to have an introduction in Gstreamer, and this python tutorial.
Requirements:
1.Python
2.Qt
3.PyQt
4.Gstreamer 0.10 and plug-ins
Here is the source code:
from PyQt4 import QtCore, QtGui
import pygst
import sys, os, time, math
pygst.require("0.10")
import gst
import gobject

#This class runs the code it contains in another thread using QThread
class Player(QtCore.QThread):
     def __init__(self):
          QtCore.QThread.__init__(self)

     def run(self):
          #create the pipeline
          player = gst.Pipeline("player")
          #filesrc element
          source = gst.element_factory_make("filesrc", "file-source")
          #volume element to adjust volume of audio
          volume = gst.element_factory_make("volume", "volume")
          #level element to get the rms/peak property
          level = gst.element_factory_make("level", "volume-level")
          #decoder to play mp3 files
          decoder = gst.element_factory_make("mad", "mp3-decoder")
          #convert the audio to play to speakers
          conv = gst.element_factory_make("audioconvert", "converter")
          #autosink if not alsa
          sink = gst.element_factory_make("autoaudiosink", "audio-output")

          #add the elements to the pipeline
          player.add(source, volume, level, decoder, conv, sink)

          #link the elements in order
          gst.element_link_many(source, decoder, conv, volume, level, sink)
          #set properties of elements
          player.get_by_name("volume").set_property('volume', 1)
          player.get_by_name("volume-level").set_property('peak-ttl' , 0)
          player.get_by_name("volume-level").set_property('peak-falloff', 20)
          #add bus to listen signal from
          bus = gst.Pipeline.get_bus(player)
          gst.Bus.add_signal_watch(bus)

          #the source of the player
          filepath = "the path of your mp3 file"
          #set the property of the element filesrc
          player.get_by_name("file-source").set_property('location', filepath)
          #play the file
          player.set_state(gst.STATE_PLAYING)
          #get the current thread in Qt
          play_thread_id = self.currentThread

          #set the minimum decibels
          MIN_DB = -45
          #set the maximum decibels
          MAX_DB = 0
          #if current thread is running
          while play_thread_id == self.currentThread:
               #listen to messages that emit during playing
               messagePoll = bus.poll(gst.MESSAGE_ANY,-1)
               #if the message is level
               if messagePoll.src == level:
                    #get the structure of the message
                    struc = messagePoll.structure
               #if the structure message is rms
               if struc.has_key('rms'):
                    rms = struc["rms"]
                    #get the values of rms in a list
                    rms0 = abs(float(rms[0]))
                    #compute for rms to decibels
                    rmsdb = 10 * math.log(rms0 / 32768 )
                    #compute for progress bar
                    vlrms = (rmsdb-MIN_DB) * 100 / (MAX_DB-MIN_DB)
                    #emit the signal to the qt progress bar
                    self.emit(QtCore.SIGNAL("setLabel"), abs(vlrms))
               #set timer
               time.sleep(0.05)

#this code produced using pyuic from qt designer
class Ui_Dialog(object):
     def setupUi(self, Dialog):
          Dialog.setObjectName("Dialog")
          Dialog.resize(QtCore.QSize(QtCore.QRect(0,0,94,300).size()).expandedTo(Dialog.minimumSizeHint()))

          self.progressBar = QtGui.QProgressBar(Dialog)
          self.progressBar.setGeometry(QtCore.QRect(10,10,31,281))
          self.progressBar.setProperty("value",QtCore.QVariant(24))
          self.progressBar.setOrientation(QtCore.Qt.Vertical)
          self.progressBar.setObjectName("progressBar")
          self.progressBar.setValue(0)
          self.progressBar.setMinimum(0)
          self.progressBar.setMaximum(100)

          self.retranslateUi(Dialog)
          QtCore.QMetaObject.connectSlotsByName(Dialog)
          #sets the value of the progress bar emited
     def setLabel(self,value):
          self.progressBar.setValue(value)

     def retranslateUi(self, Dialog):
          Dialog.setWindowTitle(QtGui.QApplication.translate("Dialog", "Dialog", None, QtGui.QApplication.UnicodeUTF8))

if __name__ == "__main__":
     app = QtGui.QApplication(sys.argv)
     window = QtGui.QDialog()
     ui = Ui_Dialog()
     ui.setupUi(window)
     window.show()
     #creates instance of the Player class
     player=Player()
     #connect to signal emitted in Player class
     QtCore.QObject.connect(player, QtCore.SIGNAL("setLabel"), ui.setLabel, QtCore.Qt.QueuedConnection)
     #run the Player class thread
     player.start()
     app.exec_()
Subscribe to:
Posts (Atom)